How to Hang a Picture: A Complete Step-by-Step Guide
Learning how to hang a picture properly is one of the simplest yet most impactful home improvement skills you can master. Whether you’re decorating a new house, refreshing a room, creating a gallery wall, or displaying a treasured family photograph, correctly how to hang a picture hanging pictures can dramatically enhance the appearance of your space. A well-placed picture adds personality, balance, and visual interest while helping transform plain walls into attractive focal points.
Despite appearing simple, many people struggle with picture placement, alignment, and choosing the correct hanging hardware. Crooked frames, damaged walls, improper spacing, and unstable mounts are common problems that can affect both appearance and safety. Fortunately, hanging a picture correctly does not require professional expertise. With the right tools, proper measurements, and a few proven techniques, anyone can achieve professional-looking results.
This comprehensive guide explains everything you need to know about how to hang a picture. From selecting the right location and measuring accurately to choosing hardware and avoiding common mistakes, you’ll learn practical strategies that make the process easier, safer, and more successful.
Why Proper Picture Hanging Matters
Many homeowners underestimate the importance of proper picture placement. A beautiful photograph or artwork can lose much of its impact when positioned incorrectly. Placement affects the overall balance of a room and influences how people perceive the space.
When pictures are hung too high, they can appear disconnected from furniture and other design elements. When hung too low, they may look crowded or awkward. Proper positioning creates harmony and allows artwork to become a natural part of the room’s design.
Correct installation also improves safety. Heavy frames that are improperly secured may fall, causing damage to walls, furniture, or valuable artwork. Using the right hardware helps ensure long-term stability and peace of mind.
By taking a thoughtful approach, you can create a polished appearance while protecting your walls and decorative pieces.
Tools You Need Before Hanging a Picture
Before starting, gather the necessary tools and supplies. Having everything ready will save time and help ensure accurate results.
Basic picture-hanging tools include a measuring tape, pencil, level, hammer, nails, picture hooks, wall anchors, screwdriver, and stud finder. Depending on the weight of the picture, additional hardware may be required.
A level is particularly important because even a slight tilt can become noticeable after installation. Measuring tools help ensure proper placement and spacing, while wall anchors provide extra support for heavier items.
Investing in quality tools makes the job easier and reduces the likelihood of mistakes.
Choosing the Right Location
The first step in hanging a picture is selecting the appropriate location. Consider the room’s layout, furniture placement, lighting conditions, and overall design style.
A common guideline is to position artwork so that the center of the piece sits approximately 57 to 60 inches from the floor. This measurement roughly corresponds to average eye level and is commonly used by museums and galleries.
When hanging artwork above furniture such as sofas, beds, or consoles, leave about six to twelve inches of space between the furniture and the bottom of the frame. This helps create visual connection without making the arrangement feel crowded.
Take time to visualize the final placement before making holes in the wall.
Understanding Different Wall Types
Not all walls are the same. The type of wall affects the hardware and installation method you should use.
Drywall is the most common wall material in modern homes. Lightweight pictures can often be hung using standard picture hooks or nails. Heavier frames may require wall anchors or mounting directly into wall studs.
Plaster walls require additional care because they can crack more easily. Specialized hardware designed for plaster surfaces is often recommended.
Brick, concrete, and masonry walls require masonry anchors and specialized drill bits. Although installation takes more effort, these surfaces provide excellent support for heavy artwork.
Understanding your wall type helps ensure safe and secure installation.
Selecting the Right Hanging Hardware
The weight of your picture determines the hardware you should use. Lightweight frames can often be supported with simple nails or picture hooks, while heavier pieces require stronger mounting solutions.
Picture hooks distribute weight more effectively than standard nails and often provide better stability. Wall anchors add support when a stud is unavailable. For very heavy artwork, mounting directly into a wall stud is typically the safest option.
Always check the weight rating of any hardware before installation. Using hardware designed for the specific weight of your picture helps prevent accidents and wall damage.
Choosing the correct hardware is one of the most important steps in the entire process.
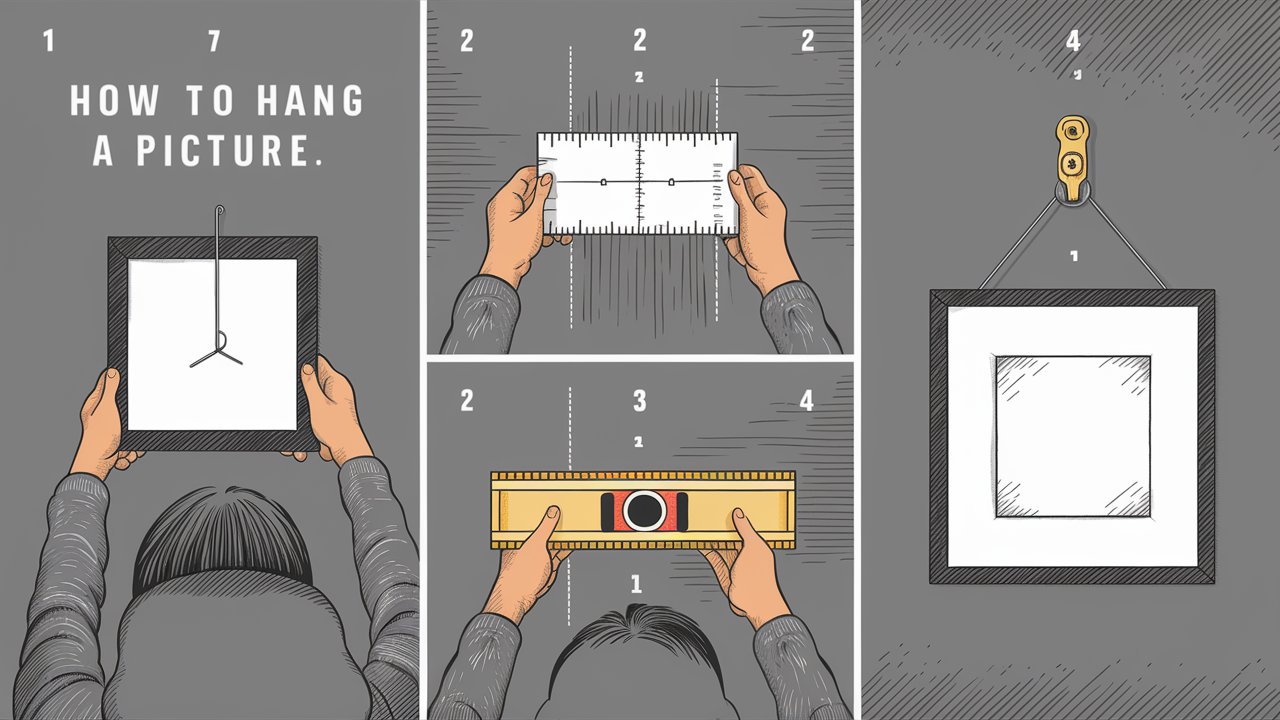
Step-by-Step Instructions for Hanging a Picture
Begin by measuring the picture and identifying the hanging point on the back. Measure the distance from the top of the frame to the hanging hardware.
Next, determine the desired center height on the wall, typically around 57 to 60 inches from the floor. Calculate where the nail or hook should be placed by accounting for the frame’s dimensions and hanging wire position.
Mark the location lightly with a pencil. Use a level to verify alignment before inserting any hardware.
Install the hook, nail, or anchor according to the manufacturer’s instructions. Carefully hang the picture and use the level again to ensure perfect alignment.
Make minor adjustments as necessary until the frame appears straight and balanced.
Creating a Gallery Wall
Gallery walls have become increasingly popular because they allow homeowners to display multiple pieces together in a visually appealing arrangement.
Before making any holes, arrange the frames on the floor to experiment with layouts. Consider spacing, frame sizes, and overall balance.
Many designers recommend maintaining two to four inches of spacing between frames. Consistent spacing creates a cohesive appearance while allowing each piece to stand out.
Starting with the largest piece as an anchor can make arranging the remaining frames easier.
A well-designed gallery wall can become a stunning focal point in any room.
Common Mistakes to Avoid
One of the most common mistakes is hanging pictures too high. This often causes artwork to feel disconnected from the rest of the room.
Another mistake is failing to use a level. Even slight misalignment can become noticeable and distracting over time.
Using inadequate hardware is another frequent issue. Hardware should always be selected based on the frame’s weight and wall type.
Many people also rush the measuring process. Taking extra time to measure accurately can prevent unnecessary holes and repositioning later.
Avoiding these mistakes helps ensure professional-looking results.
Maintaining Your Hanging Pictures
Once your pictures are installed, occasional maintenance helps keep them looking their best.
Check hardware periodically to ensure it remains secure. This is especially important for heavier frames or pieces located in high-traffic areas.
Dust frames and glass regularly to maintain their appearance. Avoid exposing valuable artwork to excessive sunlight, humidity, or temperature fluctuations, which can cause fading or deterioration.
Simple maintenance practices can extend the life of both your artwork and its mounting system.
Conclusion
Learning how to hang a picture correctly is a valuable skill that can improve the appearance and functionality of your living space. Proper placement, accurate measurements, suitable hardware, and careful installation all contribute to professional-looking results that enhance your home’s interior design.
Whether you’re hanging a single family photograph, displaying valuable artwork, or creating an elaborate gallery wall, following proven techniques helps ensure success. By understanding wall types, selecting the right tools, and avoiding common mistakes, you can confidently transform blank walls into beautiful displays that reflect your personality and style.
With patience and attention to detail, anyone can master the art of picture hanging and create attractive spaces that feel welcoming, balanced, and visually appealing.
Frequently Asked Questions (FAQ)
What is the best height to hang a picture?
Most designers recommend placing the center of the picture approximately 57 to 60 inches from the floor, which corresponds to average eye level.
How do I hang a heavy picture safely?
Use wall anchors, picture hooks rated for the weight, or mount directly into a wall stud for maximum support.
How far above furniture should a picture be hung?
Typically, artwork should be placed six to twelve inches above furniture such as sofas, beds, or consoles.
What tools do I need to hang a picture?
Basic tools include a measuring tape, level, hammer, nails or hooks, pencil, screwdriver, and wall anchors if needed.
Can I hang pictures without nails?
Yes. Adhesive strips and removable mounting systems can work for lightweight frames and temporary installations.
How do I make sure my picture is straight?
Use a level during installation and after hanging the picture to verify proper alignment.
What is the best spacing for a gallery wall?
Most designers recommend maintaining two to four inches of space between frames for a balanced appearance.